Happy New Year! It was a very busy December for me both cooking-wise and work-wise. Work went absolutely mad in December. Between holiday parties (5), a huge job assessment questionnaire to complete, and a last minute website makeover, I was dead tired and mentally exhausted.
I did get to do a bunch of baking and cooking for the above mentioned holiday parties. I made toasted oatmeal cookies and shortbread cookies for our libraries' open houses, stuffed pasta shells (x2) for the end of the semester parties for our student library aides, and Holiday Beans for the staff Christmas party.
I really like the Toasted Oatmeal Cookies. I found the recipe at the Betty Crocker website. The first time I made this recipe, I adapted it a bit to use what I had on hand. I had used my oats to make granola, and I realized that the granola was very similar to what goes into the cookies: oats and nuts, toasted in the oven before being incorporated into the dough. Instead of the 2 1/2 cups of oats and the 1 cup of nuts, I used 3 1/2 cups of granola. The recipe only calls for brown sugar, but I've found that this can make the cookies come out too thin and a little too sweet. It works better if you don't pack the brown sugar, and I think I might try it with 1 cup brown and 1/2 cup white next time.
I've mentioned the shortbread cookies in a prior post. The recipe I use comes from Brown Bag Designs Shortbread pans. I've used their Classic Shortbread recipe for years, and it never fails.
Now for the stuffed pasta shells...I realize that I haven't blogged about these before, and I must amend that oversight right now. These are always a huge hit, and I've made them for potlucks at work (current and past jobs) and for family dinners and special occasions. I got the idea from a pasta cookbook I have. I changed the recipe, of course. I just can't seem to help myself. They're not difficult, but there are several steps and the prep takes a while. The filling has cream cheese, cheddar cheese, mozzarella milk, eggs, and a little basil. I use my regular spaghetti sauce I make (usually without meat though) for covering the shells before baking. The shells are vegetarian as long as you don't use any meat or broth in your sauce.
Stuffed Pasta Shells
For the filling:
1 eight (8) ounce package cream cheese, softened
3 - 4 large eggs, room temperature
1/2 cup milk
3 - 3 1/2 cups shredded cheese (I use a mix of cheddar and mozzarella.)
1 1/2 tsp. dried basil (optional--sometimes I forget to put it in and the shells are still yummy.)
a couple of dashes of black pepper
1 box jumbo pasta shells (I like Barilla, but I've had good results with other brands as well.)
3 cups spaghetti sauce (approximately--should be enough to fill in all of the spaces around the shells once they are in the pan with some sauce left to go over the top of them. The sauce doesn't need to cover them completely, but there should be plenty)
Make the Filling:
Place the cream cheese in a large mixing bowl. Beat it on low speed with a hand mixer until the cream cheese is smooth. Add the eggs and continue beating until well incorporated. There may still be small chunks of cream cheese, but that's okay as long as it's mostly blended well with the eggs. Stir in the milk, and then fold in cheese. The filling can be mixed and chilled an hour or two head of time. Chilling the filling helps thicken it and makes it easier to fill the shells.
Pre-cook the Pasta:
Cook the pasta shells according to the package directions, but for a minute less than al dente. For example, if the pasta box says that the shells will cook to al dente in 10 minutes, I cook them for 9 minutes. Drain and rinse the shells in cold water until they are cool enough to handle.
Assemble the Shells:
Preheat oven to 350 degrees. Rub a little olive oil over the bottom and sides of a 13 x 9 inch baking pan. Spread about 3/4 cup of sauce in the bottom of the pan.
Using a teaspoon (not the measure, but the place-setting spoon), spoon filling into shells. Fill each shell with a heaping scoop. The shells should be filled but not overstuffed. The edges of the shells should still be able to touch. Place each shell in the pan as you fill it. You should be able to fit all of the shells into the pan.
Pour the remaining sauce over the shells then gently shake the pan to get the sauce into all of the spaces between the shells. Loosely cover with a piece of foil and bake in the oven for 45 minutes. Remove the pan from the oven, take off the foil, and sprinkle the top of the shells with some freshly-grated Parmesan cheese. Put the pan back in the oven for 15 minutes, until the Parmesan is melted and the sauce is bubbling.
Remove from the oven and let sit for 20 minutes before serving.
After all the craziness of the last two weeks of work, I flew back to California to spend Christmas with family. I got a chance to relax over the holidays, and I had a great time visiting my wonderful family: mom, sister, brother-in-law' and nephew, and some of my dearest friends. I didn't get to see my brother and sister-in-law, but we did have a nice talk on Christmas. However, I got to visit them back in September, which was great. I was so happy to see them. They moved away when I moved here to Arizona, and I hadn't seen them since I moved. Hopefully we can all be together next year around Christmas.
I hope you all had a very Merry Christmas, Happy Hanukah, and wish you a very Happy New Year.
Sunday, January 13, 2013

Tuesday, October 16, 2012
Holiday Beans
I wrote the following dinner report last year, but I never got around to posting it. I stumbled across it the other day (virtually speaking--it's on my computer) and thought I'd post it.
Well, it's been an age since I last posted. I apologize for the long delay in posts. It's not that I haven't been cooking or eating dinner; it's just the I've been wrapped up in moving, starting a new job, learning a new job, and generally getting used to my new life and routine. Now that I've finished my first semester as a college librarian, I have 5 wonderful weeks off to celebrate Christmas with (some of) my family, visit my friends, and then enjoy my birthday before heading back to Spring semester 2012.
Since I last posted, I have cooked quite a bit. I've made some old favorites like chili, scotch broth, spaghetti, and linguine carbonara. I've also made stuffed pasta shells and a ton of cookies for various Christmas gatherings for work as well as the famous Praline Pumpkin Torte.
One of my favorite things to make for family holiday get-togethers is the doctored up baked beans that were one of my dad's favorites. He really liked baked beans in most forms, but he always said these were his favorite. I just wish he could be here this year to have them again. The beans are pretty simple to make, starting with canned beans and adding a few ingredients, but the result is so good.
Alex's Christmas Beans
8 oz bacon, regular--not thick cut
1 large yellow onion, finely minced
2 large (28 oz.) cans Bush's Original Baked Beans
Yellow Mustard
Brown sugar
Chop or snip the bacon in to very small pieces. I like to use a pair of kitchen shears as they make short work of the bacon. Over medium heat, saute in a large, deep saucepan, stockpot, or dutch oven until bacon is just barely crispy and most of the fat has rendered out. Scoop out the bacon with a slotted spoon and allow to drain on a paper-towel covered plate. Pour out all but about 2 tablespoons of the bacon fat. Add the onion and cook until soft and beginning to turn a caramel color.
Once the onion is completely soft, pour in the two cans of beans, liquid and all. Stir to incorporate the onions throughout. Add 2 Tbsp yellow mustard and 1/4 cup brown sugar and stir to combine well. Stir in the bacon pieces. Heat to bubbly, then reduce heat and simmer for 30 minutes. Taste the beans. They should have a sweet, mellow smoky flavor with a bit of tang. Adjust as needed with either mustard or brown sugar and allow to simmer for another 30 minutes to 1 hour. These beans can just sit on the stove simmering while you prepare the rest of the dinner. These are especially good served with ham and cornbread.
Thanks for reading. I'm going to be trying a couple new recipes this week, so I hope to add 1 or 2 additional posts soon. I'm making Bacon, Lentil, and Spinach Stew and Chicken and Leek Pie from my new cookbook, "One Pot of the Day: 365 Recipes for Every Day of the Year." I'll also be roasting a chicken with lemon and fresh herbs, (I'll use the leftovers for the pie.) and doing some roasted root vegetables or maybe a vegetable curry. I love fall!
Saturday, September 29, 2012
Mmmm...Lamb
This week, I made Spicy Grilled Lamb Burgers in pitas with tzatziki sauce. I posted about a similar dish I made about 2 years ago. I sort of just tossed that one together. For this one, I did some research, and it was even better than the last one.
In case you don't know, tzatziki is a Greek yogurt cucumber sauce usually served with pita wedges or on gyros. There are many variations of tzatziki around the Meditteranean and south-western Asia. In India, cucumber raita is similar in taste but much thinner. It's great for cooling down spicy curries. I looked up recipes for tzatziki and read several. I didn't follow any one recipe, but took the common elements among most of the recipe I read. I did not include the fresh herbs some of the recipes called for (usually dill, mint, or parsley), but I wasn't concerned with making a truly authentic tzatziki because I was making curried lamb burgers, not Greek gyros. There were differences in the various recipes. It's funny, some recipes called for plain yogurt, some called for sour cream, and some called for both. The recipes that called for plain yogurt had you strain the yogurt first for several hours to get out the excess liquid. Doing that, you end up with a thicker yogurt instead of the thin regular yogurt.
Since I had a container (6 oz.) of Chobani non-fat plain Greek yogurt, I skipped that step since Greek yogurt has already been strained. I added 3 cloves of garlic, minced and about 2/3 of a peeled cucumber. I had a regular cucumber with seeds, so I cut it in half and scraped out the seeds before grating it using a regular box grater. You can also use an English or Japanese seedless cucumber. I squeezed out some of the liquid using a paper towel then mixed the shredded cucumber into the yogurt. I stirred in about 1/2 tsp olive oil (for texture) and the juice of half a lemon. I then added just a little salt to taste. Once it was well mixed, I put it in the fridge to let all the flavors meld.
After about an hour I pulled it out of the fridge to taste it. The flavors came together nicely, but it was pretty tangy. I stirred in about 1/2 of a teaspoon of sugar and then let it sit while I made the lamb.
For the lamb burgers, I found this recipe for Spicy Lamb Patties on All-Recipes.com. I followed the recipe, though I didn't have green onion so substituted a little finely minced white onion. I flattened out the patties then grilled them using my non-stick grill pan rubbed with a little oil.
Normally, I would probably pop the pita in the microwave to heat up. However, since moving, I don't have a microwave, and I don't miss it all that much. Instead, I patted just a tiny bit of water onto the whole wheat pita then wrapped it in foil and put it in the oven to heat up. This turned out great. I ended up with a soft, warm pita.
I put the burger in the pita and slathered on some tzatziki and bit in. I couldn't believe how good it turned out. I only wish I'd had some lettuce to put in the pita with the burger. That would have been perfect. All in all, a highly successful dinner.
In case you don't know, tzatziki is a Greek yogurt cucumber sauce usually served with pita wedges or on gyros. There are many variations of tzatziki around the Meditteranean and south-western Asia. In India, cucumber raita is similar in taste but much thinner. It's great for cooling down spicy curries. I looked up recipes for tzatziki and read several. I didn't follow any one recipe, but took the common elements among most of the recipe I read. I did not include the fresh herbs some of the recipes called for (usually dill, mint, or parsley), but I wasn't concerned with making a truly authentic tzatziki because I was making curried lamb burgers, not Greek gyros. There were differences in the various recipes. It's funny, some recipes called for plain yogurt, some called for sour cream, and some called for both. The recipes that called for plain yogurt had you strain the yogurt first for several hours to get out the excess liquid. Doing that, you end up with a thicker yogurt instead of the thin regular yogurt.
 |
After about an hour I pulled it out of the fridge to taste it. The flavors came together nicely, but it was pretty tangy. I stirred in about 1/2 of a teaspoon of sugar and then let it sit while I made the lamb.
For the lamb burgers, I found this recipe for Spicy Lamb Patties on All-Recipes.com. I followed the recipe, though I didn't have green onion so substituted a little finely minced white onion. I flattened out the patties then grilled them using my non-stick grill pan rubbed with a little oil.
Normally, I would probably pop the pita in the microwave to heat up. However, since moving, I don't have a microwave, and I don't miss it all that much. Instead, I patted just a tiny bit of water onto the whole wheat pita then wrapped it in foil and put it in the oven to heat up. This turned out great. I ended up with a soft, warm pita.
I put the burger in the pita and slathered on some tzatziki and bit in. I couldn't believe how good it turned out. I only wish I'd had some lettuce to put in the pita with the burger. That would have been perfect. All in all, a highly successful dinner.
Friday, September 7, 2012
Dinner Photos and Others
I ate leftovers last night, and the Vegetable Curry was still really good. I took some of the leftover rice, mixed in some slivered almonds, and made it into small patties which I then cooked in a non-stick skillet. I reheated the curry and poured it over the rice and added some fresh spinach. Very yummy. The pictures aren't the greatest, but you can get the idea.

and It's A Small World at Disneyland all lit up...

and a cool b&w ladybug I found on my car a few months ago.


| In case that isn't particularly appealing, here's a nice picture of a rainbow over my neighbor's house... | |||
 |
|
||

and It's A Small World at Disneyland all lit up...

and a cool b&w ladybug I found on my car a few months ago.

Wednesday, September 5, 2012
Happy Memories of Chickpeas
Well, it wasn't Meatless Monday this week, but it was Veggie Wednesday. I made a
vegetable curry, an Indian-type curry made with wonderful curry powder my mom
sent me. She got it at a great market somewhere in the Napa Valley area. I
can't remember exactly where or the name of the market (even though I've actually been there once or twice). The curry wasn't completely vegetarian because I used
chicken stock (actually Better Than Bullion dissolved in some water--love this
stuff), but it didn't contain any actual meat. You could substitute water or vegetable brother for the bullion to make this truly vegetarian.
I do not like garbanzo beans much at all. I don't like them in salads, I don't like them in soups, I don't even really like hummus. I think it's partly taste and partly texture. However, for some reason I like chickpeas (I prefer this name to garbanzo beans, maybe because I think of garbanzo beans as being something you add to salads.) in curry. I think I like them because they pick up lots of flavor from the curry, and they simmer long enough to be soft, so the texture issue is moot.
I never would have known I liked chickpeas if it hadn't been for an Indian restaurant called Deboo's (I think that was the name) that used to be in the Bel Air shopping center in Natomas. The first time I went in, the owner asked what I wanted to order. I said I wasn't sure, and he said he would make me something good. He gave me tandoori chicken, some naan, a cauliflower dish, and curried peas & chickpeas. I didn't think I'd like the chickpeas, but they were surprisingly good. I was happy to expand my culinary vista.
Here's what I did to make my vegetable curry:
First, I cut a leek lengthwise and then thinly sliced it into half rings. I sauteed these in a small amount of fat (equal parts olive oil & butter). After the leeks softened, I added a tablespoon of curry powder and stirred that around for a few minutes. I then tipped in a can of drained & rinsed garbanzo beans and a small to medium potato cut into chunks. I dissolved a rounded teaspoon of Better Than Bullion Chicken in 1.5 cups warm water. I poured that over the beans & potato chunks. I let this simmer, covered, for about 25 minutes.
Once the beans were tender & the potato cooked, I added some cornstarch to thicken the sauce and added some zucchini. I let this cook a little while longer until the zucchini was cooked but not mushy. I was going to add some spinach or cabbage but my pan was full, so I just left it as it was. It turned out really well. I served the curry over some rice. I think it made about 4 servings. Anyway, I have leftovers.
The other way I like chickpeas is as falafal. Okay, so it's not really the same, but falafal is made with ground chickpeas. The first time I had a falafal was in Boston. Some friends took me to a tiny, hole-in-the-wall, Middle Eastern grocery near Haymarket. It's right along where they have the outdoor fruit & vegetable market during the warmer months. The shop is down about 5 steps from street level, and you have to duck to avoid whacking your head on the top of the door frame. Inside there are shelves of groceries and bins of spices. Tucked to one side is a food counter. You can get takeaway of various types including shawarma & falafal sandwiches.
There is a little old man who works behind the counter. I never did get his name, but everyone referred to him as Falafal Man (though not to his face). He makes the food, and it is delicious! For the falafal sandwiches he takes a piece of flatbread (locally made), spreads on some tahini & harissa, layers on some veggies including small wedges of dill pickles (unexpected, but delicious), and then tops that with falafal which he smashes a bit to break open and then wraps it all up. The sandwich is delicious, and Falafal Man is such a sweetie. Several of us from Simmons went to see him right before graduation to say goodbye and to get a last falafal sandwich. He came out from behind the counter and hugged each of us. Next time I visit Boston, I am definitely going back.
I do not like garbanzo beans much at all. I don't like them in salads, I don't like them in soups, I don't even really like hummus. I think it's partly taste and partly texture. However, for some reason I like chickpeas (I prefer this name to garbanzo beans, maybe because I think of garbanzo beans as being something you add to salads.) in curry. I think I like them because they pick up lots of flavor from the curry, and they simmer long enough to be soft, so the texture issue is moot.
I never would have known I liked chickpeas if it hadn't been for an Indian restaurant called Deboo's (I think that was the name) that used to be in the Bel Air shopping center in Natomas. The first time I went in, the owner asked what I wanted to order. I said I wasn't sure, and he said he would make me something good. He gave me tandoori chicken, some naan, a cauliflower dish, and curried peas & chickpeas. I didn't think I'd like the chickpeas, but they were surprisingly good. I was happy to expand my culinary vista.
Here's what I did to make my vegetable curry:
First, I cut a leek lengthwise and then thinly sliced it into half rings. I sauteed these in a small amount of fat (equal parts olive oil & butter). After the leeks softened, I added a tablespoon of curry powder and stirred that around for a few minutes. I then tipped in a can of drained & rinsed garbanzo beans and a small to medium potato cut into chunks. I dissolved a rounded teaspoon of Better Than Bullion Chicken in 1.5 cups warm water. I poured that over the beans & potato chunks. I let this simmer, covered, for about 25 minutes.
Once the beans were tender & the potato cooked, I added some cornstarch to thicken the sauce and added some zucchini. I let this cook a little while longer until the zucchini was cooked but not mushy. I was going to add some spinach or cabbage but my pan was full, so I just left it as it was. It turned out really well. I served the curry over some rice. I think it made about 4 servings. Anyway, I have leftovers.
The other way I like chickpeas is as falafal. Okay, so it's not really the same, but falafal is made with ground chickpeas. The first time I had a falafal was in Boston. Some friends took me to a tiny, hole-in-the-wall, Middle Eastern grocery near Haymarket. It's right along where they have the outdoor fruit & vegetable market during the warmer months. The shop is down about 5 steps from street level, and you have to duck to avoid whacking your head on the top of the door frame. Inside there are shelves of groceries and bins of spices. Tucked to one side is a food counter. You can get takeaway of various types including shawarma & falafal sandwiches.
There is a little old man who works behind the counter. I never did get his name, but everyone referred to him as Falafal Man (though not to his face). He makes the food, and it is delicious! For the falafal sandwiches he takes a piece of flatbread (locally made), spreads on some tahini & harissa, layers on some veggies including small wedges of dill pickles (unexpected, but delicious), and then tops that with falafal which he smashes a bit to break open and then wraps it all up. The sandwich is delicious, and Falafal Man is such a sweetie. Several of us from Simmons went to see him right before graduation to say goodbye and to get a last falafal sandwich. He came out from behind the counter and hugged each of us. Next time I visit Boston, I am definitely going back.
Sunday, April 8, 2012
A Successful Stir-Fry

Well, it's been nearly a year since I last posted, and a lot has happened. I got a full-time job, moved to a new state, and finished my first semester as a professional librarian. I also turned 40 and went to Hawaii. It's been a busy year.
Just because I haven't posted doesn't mean I haven't been cooking during the year. I still have the information about the trifle I made from the Madeira cake (the one that turned out not so great). The trifle was much better than the cake. I also made some granita from orange, peach, mango juice and gin. Pretty tasty.
Tonight I made a very successful stir fry from a recipe from Williams-Sonoma. The recipe is called Stir-Fried Pork and Sugar Snaps with Soba Noodles.
The recipe sounded easy with ingredients available at the local grocery store. I was really surprised to see no garlic in the list of ingredients though. The main flavors come from soy sauce, ginger, sesame oil, and red pepper as well as a generous amount of green onions. There was a lot of oil in the recipe between the sesame oil and the oil for cooking the pork. I think it could be reduced, at least the amount needed to sautée the pork could be. A tablespoon was way more than needed. The flavor turned out well. I might try it with some garlic next time though to see how that changes it.
picture from Williams-Sonoma.com
Sunday, March 27, 2011
Dinner With A Side Of Nostalgia
Pot Roast
 Does anybody out there make pot roast regularly? I haven't made one in years, but I found this great grass-fed chuck roast recently at Noah's Ark in Placerville. There's just something homey and comforting about pot roast. It reminds me of my grandma (my dad's mom) who passed away a little over a year ago. There were three dishes that I think of as her specialties: "Spanish" meatballs, mustard/brown sugar pork chops, and pot roast. She made excellent corned beef and cabbage too, and her cole slaw (she always called it cabbage & carrot salad) couldn't be beat. She also made the best butter cookies. I've got the recipe somewhere. They were just light and crispy with a nice buttery flavor without being too rich. I can remember helping her mix up batches when I visited her.
When my siblings and I were kids, we would each go spend a week with grandma individually during the summer. During that week, the kid who was visiting was "The Big Cheese." My grandma and I would bake cookies, go shopping, and play tourist in Sacramento. She taught me how to crochet (I made endless hats, scarves, and socks for all the stuffed animals), to play cribbage, and to swim. Her neighbor had Corgis that were so cute. It's funny how much you remember when you start thinking about your childhood.
Well, this is supposed to be a food blog, so I'm writing today about the pot roast (pretty darn good) and the madeira cake (not quite a fail) I made yesterday. Once again, I didn't have a go-to recipe, so I cobbled together a recipe I found online with my mom's advice on how to proceed in the endeavor of pot roast making, and the result was quite yummy.
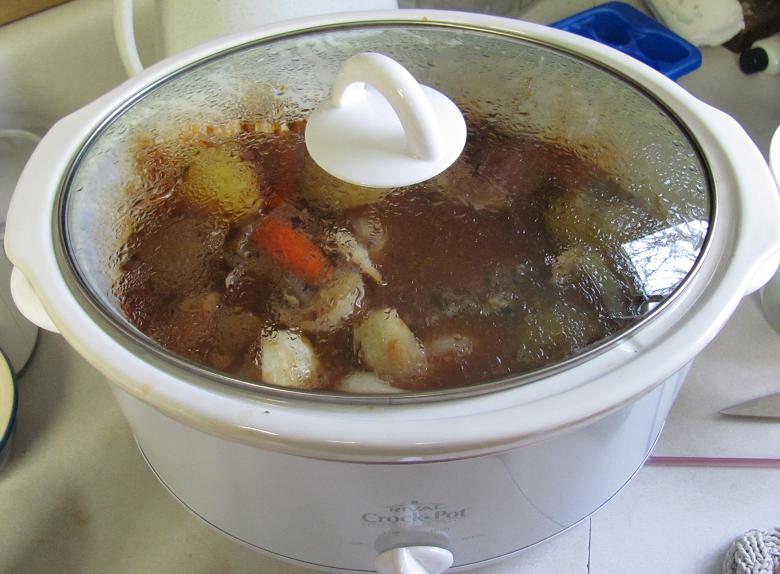
 First I patted the chuck roast dry with a paper towel then sprinkled it with a little flour, salt, and pepper before browning it on all sides in a skillet with a little oil. Once all the sides were nice and brown, I transferred the roast to my Crockpot. I love this Crockpot; it was a gift from my sister one year for Christmas or my birthday, and it is just perfect. It's a perfect size, not too small and not too big, and it's not all gadgety with digital readouts and programmable controls. It has 4 settings: high, low, warm, and off. That's the beauty of a Crockpot, you don't have to do much. Once you start it, it's good on its own for several hours (or more) before you have to do anything. When the dish is done, you really only have to turn it down to warm or off and serve dinner.
The chuck roast went into the Crockpot along with a sliced yellow onion, a few potatoes, and some carrots. I threw in some garlic powder, parsley, and thyme for good measure. Then I poured in one 12 oz can of V-8 and about a cup and a half of water. My mom suggested the V-8 because that's how she used to make it. She said she used it because it added the flavor of the vegetables, but not chunks of veggies we kids didn't like when we were little. I turned the Crockpot to high and left it for about an hour. Then I turned it to low and left it for another 5 hours or so.
When the roast was done, I turned the Crockpot to warm and then ladled out about 2 cups of the broth, straining it into a smaller bowl. I chilled this for a bit so I could skim as much fat off as I could before using it to make the gravy. When I made the gravy, I browned some flour in a dry pan. You don't really need to used oil or butter to brown the flour when making gravy (cream sauce is another story). Just keep the flour moving (I use a wire whisk) and the temperature of the burner at medium to medium-low, and it browns just fine. Once the flour is ready, pour in the hot liquid and stir like crazy. This works for me, minimizing the problem of lumps. I added a little salt and pepper and let it bubble for a bit before serving it up with the roast and vegetables. All-in-all a success, and and enough leftovers so I can take some for lunch at work tomorrow.
Madeira Cake
While the roast was cooking, I was thumbing through my new baking book I got just after Christmas. It is full of interesting recipes I'm not very familiar with. One of these is madeira cake. The description goes like this, "This rich butter cake was popular in Victorian England. It was often served with a glass of Madeira, hence the name. It is a moist tender cake due to the high butter content." Sadly, the same could not have been said about my cake. The photo and description in the cookbook made it sound similar to pound cake only with some orange zest mixed in. Something didn't seem quite right when I mixed up the batter; it was more like soft cookie dough than cake batter. It seems to me now that the amount of flour called for might have been too much and/or the liquid ingredients should have been increased. Still, I persevered. I spooned the batter into the loaf pan and patted it smooth. I baked it exactly according to directions: 315 degrees (weird) for 50 minutes.
The cake was not a success. It was dense and on the dry side. The crispy texture of the outer crust was good, as was the flavor of the cake (I mixed in about a teaspoon each of orange and lemon zest.) The texture really needed help. My mom sprinkled some Amaretto Di Saronno on her piece after the first bite, which helped with the dryness. The one thing that did go perfectly was turning the cake out of the pan. The recipe called for greasing the pan then lining it with parchment paper. Once the cake was baked and allowed to cool for about 10 minutes, it just slid right out of the pan, and the crust was smooth with no stuck spots.
After about an hour's mild disappointment, I had a brilliant thought: Trifle! The cake would be perfect to use in a trifle. Slices of cake or ladyfingers are layered on the bottom and part way up the sides of a trifle dish (if you have one. otherwise, a glass bowl). The cake is then brushed with liqueur or sherry then layered with fruit, custard, sometimes jelly (either Jello or jam), and topped with whipped cream. There are any number of variations. I will be making the trifle tomorrow night or possibly Tuesday, and we'll see how the cake tastes in that. I think it will hold up well; the wet ingredients (liqueur, custard) will soften and moisten it without causing it to dissolve into a soggy mess. I'll let you know how it turns out.
 Does anybody out there make pot roast regularly? I haven't made one in years, but I found this great grass-fed chuck roast recently at Noah's Ark in Placerville. There's just something homey and comforting about pot roast. It reminds me of my grandma (my dad's mom) who passed away a little over a year ago. There were three dishes that I think of as her specialties: "Spanish" meatballs, mustard/brown sugar pork chops, and pot roast. She made excellent corned beef and cabbage too, and her cole slaw (she always called it cabbage & carrot salad) couldn't be beat. She also made the best butter cookies. I've got the recipe somewhere. They were just light and crispy with a nice buttery flavor without being too rich. I can remember helping her mix up batches when I visited her.
When my siblings and I were kids, we would each go spend a week with grandma individually during the summer. During that week, the kid who was visiting was "The Big Cheese." My grandma and I would bake cookies, go shopping, and play tourist in Sacramento. She taught me how to crochet (I made endless hats, scarves, and socks for all the stuffed animals), to play cribbage, and to swim. Her neighbor had Corgis that were so cute. It's funny how much you remember when you start thinking about your childhood.
Well, this is supposed to be a food blog, so I'm writing today about the pot roast (pretty darn good) and the madeira cake (not quite a fail) I made yesterday. Once again, I didn't have a go-to recipe, so I cobbled together a recipe I found online with my mom's advice on how to proceed in the endeavor of pot roast making, and the result was quite yummy.
 First I patted the chuck roast dry with a paper towel then sprinkled it with a little flour, salt, and pepper before browning it on all sides in a skillet with a little oil. Once all the sides were nice and brown, I transferred the roast to my Crockpot. I love this Crockpot; it was a gift from my sister one year for Christmas or my birthday, and it is just perfect. It's a perfect size, not too small and not too big, and it's not all gadgety with digital readouts and programmable controls. It has 4 settings: high, low, warm, and off. That's the beauty of a Crockpot, you don't have to do much. Once you start it, it's good on its own for several hours (or more) before you have to do anything. When the dish is done, you really only have to turn it down to warm or off and serve dinner.
The chuck roast went into the Crockpot along with a sliced yellow onion, a few potatoes, and some carrots. I threw in some garlic powder, parsley, and thyme for good measure.
 Then I poured in one 12 oz can of V-8 and about a cup and a half of water. My mom suggested the V-8 because that's how she used to make it. She said she used it because it added the flavor of the vegetables, but not chunks of veggies we kids didn't like when we were little. I turned the Crockpot to high and left it for about an hour. Then I turned it to low and left it for another 5 hours or so.
When the roast was done, I turned the Crockpot to warm and then ladled out about 2 cups of the broth, straining it into a smaller bowl. I chilled this for a bit so I could skim as much fat off as I could before using it to make the gravy. When I made the gravy, I browned some flour in a dry pan. You don't really need to used oil or butter to brown the flour when making gravy (cream sauce is another story). Just keep the flour moving (I use a wire whisk) and the temperature of the burner at medium to medium-low, and it browns just fine. Once the flour is ready, pour in the hot liquid and stir like crazy. This works for me, minimizing the problem of lumps. I added a little salt and pepper and let it bubble for a bit before serving it up with the roast and vegetables. All-in-all a success, and and enough leftovers so I can take some for lunch at work tomorrow.
Madeira Cake
While the roast was cooking, I was thumbing through my new baking book I got just after Christmas. It is full of interesting recipes I'm not very familiar with. One of these is madeira cake. The description goes like this,
 "This rich butter cake was popular in Victorian England. It was often served with a glass of Madeira, hence the name. It is a moist tender cake due to the high butter content." Sadly, the same could not have been said about my cake. The photo and description in the cookbook made it sound similar to pound cake only with some orange zest mixed in. Something didn't seem quite right when I mixed up the batter; it was more like soft cookie dough than cake batter. It seems to me now that the amount of flour called for might have been too much and/or the liquid ingredients should have been increased. Still, I persevered. I spooned the batter into the loaf pan and patted it smooth. I baked it exactly according to directions: 315 degrees (weird) for 50 minutes.
The cake was not a success. It was dense and on the dry side. The crispy texture of the outer crust was good, as was the flavor of the cake (I mixed in about a teaspoon each of orange and lemon zest.) The texture really needed help. My mom sprinkled some Amaretto Di
 Saronno on her piece after the first bite, which helped with the dryness. The one thing that did go perfectly was turning the cake out of the pan. The recipe called for greasing the pan then lining it with parchment paper. Once the cake was baked and allowed to cool for about 10 minutes, it just slid right out of the pan, and the crust was smooth with no stuck spots.
After about an hour's mild disappointment, I had a brilliant thought: Trifle! The cake would be perfect to use in a trifle. Slices of cake or ladyfingers are layered on the bottom and part way up the sides of a trifle dish (if you have one. otherwise, a glass bowl). The cake is then brushed with liqueur or sherry then layered with fruit, custard, sometimes jelly (either Jello or jam), and topped with whipped cream. There are any number of variations. I will be making the trifle tomorrow night or possibly Tuesday, and we'll see how the cake tastes in that. I think it will hold up well; the wet ingredients (liqueur, custard) will soften and moisten it without causing it to dissolve into a soggy mess. I'll let you know how it turns out.
Subscribe to:
Posts (Atom)